Arch GPRS V2

Arch GPRS V2 is the new and improved version of the Arch GPRS development board from Seeed Studio. Like the original Arch GPRS, it is also an mbed enabled development board that houses a cellular networking module along with a microcontroller. Arch GPRS V2 uses the LPC11U37 Microcontroller instead of the LPC11U24 used on the Arch GPRS. You can use the mbed C/C++ SDK, libraries and optimizing online development tools to rapidly build your Arch GPRS V2 based prototype. 
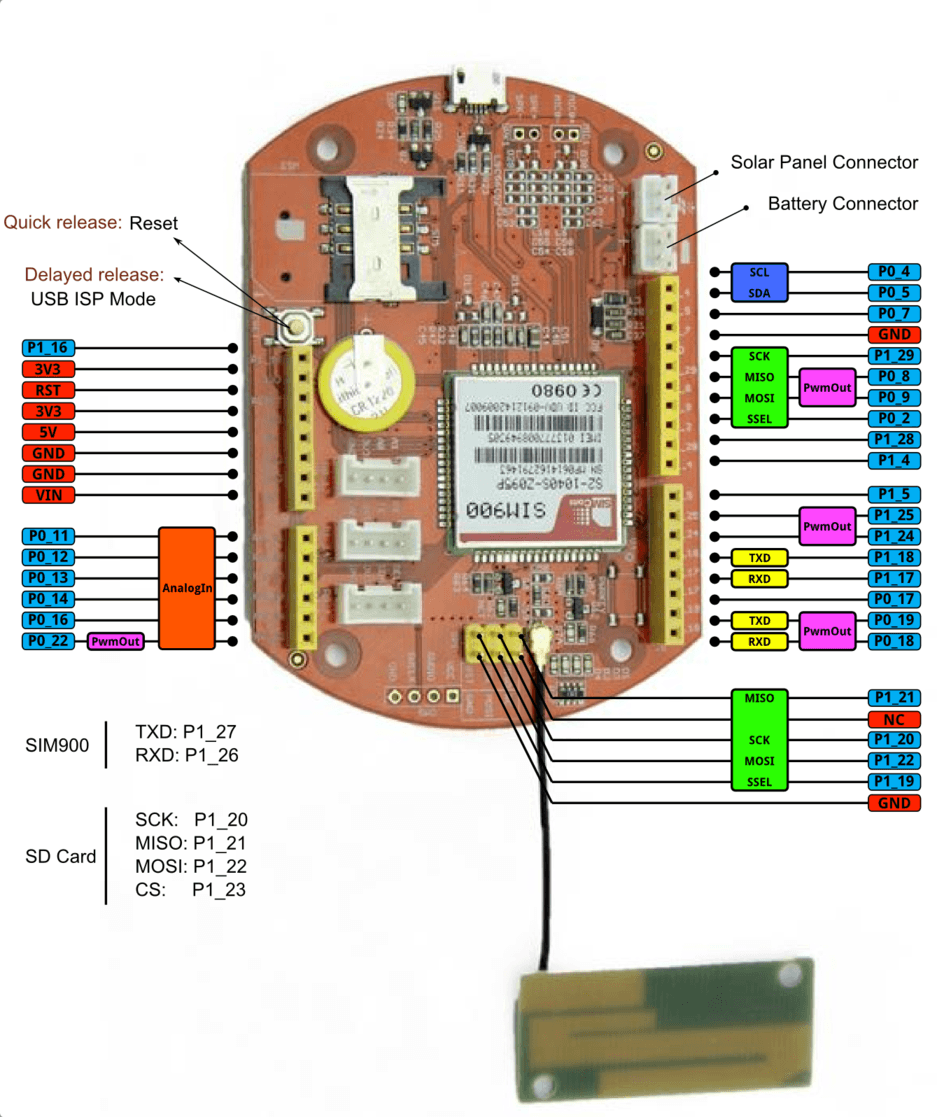
The cellular networking module on the Arch GPRS is based on the SIM900 Quad-band GSM/GRPS engine from SIMCom. With this, data collection functions can be performed easily using the 2G GSM/GPRS based cellular network.
Arch GPRS V2 has a standard Arduino interface as well as Grove connectors on board. It’s convenient to connect existing Shields and Grove products to Arch GPRS V2. You can even connect a solar panel directly to the board to allow for the battery to charge from it. A low-power design guarantees easy charging and long hour operations when outdoors!

Note:

Arch GPRS V2 doesn't come with an mbed interface. To output debug messages, please try USBSerial.

Features

  • Online development tools
  • Easy to use C/C++ SDK
  • Lots of published libraries, projects
  • Low power ARM Cortex-M0 Core
  • On chip 128KB Flash, 12KB SRAM, 4KB EEPROM
  • USB Device, UART, I2C
  • Quad-band (850/900/1800/1900MHz) GSM/GPRS support
  • Supports external SIM card: 1.8V/3V
  • Control with standard AT Commands

ArchGPRS V2 vs ArchGPRS

Key differences between ArchGPRS V2 and ArchGPRS
ArchGPRS V2 ArchGPRS
MCU LPC11U27 LPC11U24
GSM/GPRS Module SIM900 EG-10
MicroSD Card Yes No

Pinout

Getting Started

  1. Login into the mbed environment from here
  2. Import the mbed_blinky program
  3. Verify that the code imported in main.cpp in the mbed_blinky folder in the mbed online Compiler environment is as indicated in the figure above under Step 3. Ensure that the platform selected for compiling the code for is the Seeeduino-Arch. Now go ahead and compile the code. When asked to save the resultant binary file (.bin), save it to a designated folder on your PC.
  4. Now connect your Arch board to your PC and long press the reset button. A removable USB drive named CRP DISABLD should automatically appear on your PC. Go to the CRP DISABLD drive, delete the existing firmware file that you see in the folder and copy the downloaded binary file to CRP DISABLD. Quick press the reset button to run the new binary.
  5. Verify that your code is running successfully by looking at the ArchGPRS V2 board. If the right-most LED from the Pinout shown above is blinking and the other 3 LEDs next to it are all ON, this implies that your code is working.
You can change the code to the following and see what happens:
#include "mbed.h"

DigitalOut myled1(LED2); //left most LED if board is held as shown in Pinout diagram above
DigitalOut myled2(LED3); //2nd from left
DigitalOut myled3(LED4); //3rd from left
DigitalOut myled4(LED1); //4th from left (right most)

int main() {
    while(1) {
                
        myled1 = 1; //left most LED turns ON, rest off
        myled2 = 0;
        myled3 = 0;
        myled4 = 0;
        
        wait(1); //1 sec wait time
        myled1 = 0;
        myled2 = 1; //2nd from left LED turns ON, rest off
        myled3 = 0;
        myled4 = 0;

        wait(1);
        myled1 = 0;
        myled2 = 0;
        myled3 = 1; //3rd from left LED turns ON, rest off
        myled4 = 0;
        
        wait(1);
        myled1 = 0;
        myled2 = 0;
        myled3 = 0;
        myled4 = 1; //4th from left (right most) LED turns ON, rest off
        
        wait(1);
    }
}
When you Compile and Run the above code on the ArchGPRS V2 board, you should see that the LEDs now blink in sequence.


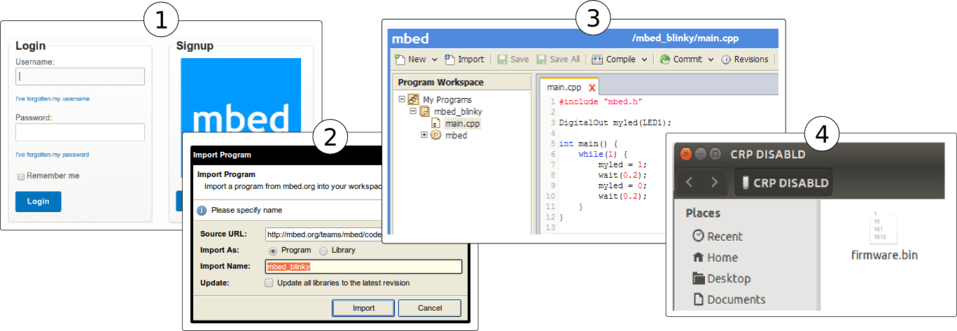
If you get through the above steps successfully, this means that:

  1. Your ArchGPRS V2 is powering up correctly
  2. Your code is being downloaded and run by the ArchGPRS V2 module correctly
  3. You are ready to take on more complex projects now!

Programming Arch on Windows, Linux or Mac

Arch doesn't have an mbed interface. It uses USB In-System-Programming (ISP) to upgrade the firmware.

To enter the USB ISP mode, connect the Arch with your computer and long press its button, and then a disk named "CRP DISABLD" will appear.

  1. delete firmware.bin in the "CRP DISABLD" disk.
  2. copy a new firmware into the disk.
  1. if the disk is not mounted, mount the disk at {mnt_dir}
  2. dd if={new_firmware.bin} of={mnt_dir}/firmware.bin conv=notrunc
  1. dd if={new_firmare.bin} of=/Volumes/CRP\ DISABLD/firmware.bin conv=notrunc
If you're so inclined, you can also create an Automator application to support drag-and-drop of the file to your board. Just create a "Run Shell Script" with the following command:
dd if=$* of=/Volumes/CRP\ DISABLD/firmware.bin conv=notrunc
You will also need to change the "Pass Input" option from "to stdin" to "as arguments"--without this you will get an error "The action 'Run Shell Script' encountered an error" or "dd: no value specified for if (1)" in the log.
Also, an improved form of the script is:
dd if="${1}" of=/Volumes/CRP\ DISABLD/firmware.bin conv=notrunc
Which should handle spaces in the file path and only uses the first file supplied.

Very quick press the button to run the new firmware.

Applications and Library

Resources

Copyright (c) 2008-2016 Seeed Development Limited (www.seeedstudio.com / www.seeed.cc)
This static html page was created from http://www.seeedstudio.com/wiki